Monday, February 29, 2016

Calf Care, Part II [Dairy Star Column]

Like little humans, when calves catch a stomach bug, keeping them hydrated is extremely important. In the photo below, Jewel's little Jersey heifer calf sips the calf version of Pedialyte®.


A couple weeks ago, I wrote a column about calf care. My latest column in the Dairy Star was devoted to answering several questions I got from readers regarding that post.

Wednesday, February 17, 2016

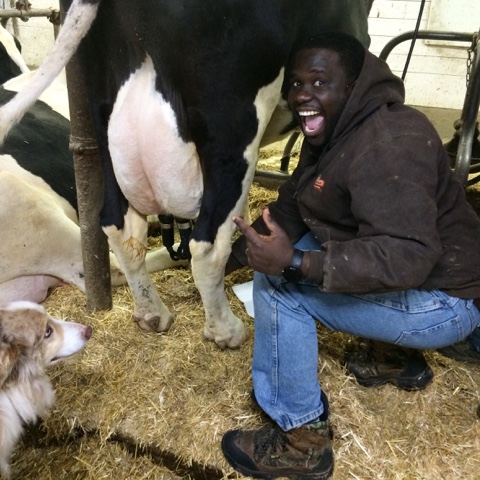
The doctor milks a cow

How one doctor's desire to learn more brought him to our farm.


Over the years, we’ve had lots of requests for farm visits. I can’t help but honor those requests. If someone wants to learn more about dairy farms or learn how to milk a cow, then our farm can provide those opportunities.

But this was the first time a doctor has asked to visit our farm. And it was the first time we’ve had a request for a farm visit in the middle of winter. Usually, the snow and cold temperatures scare visitors away.

Not Dr. Adegoke. He was so excited when he arrived last Thursday. Dr. Adegoke is completing his family medicine residency at the CentraCare Clinic here in Melrose. The clinic’s director, Julia, accompanied him to our farm.

After we finished our introductions, the first words Dr. Adegoke said were, “This is so exciting. I’ve never been to a farm before.”

“Any kind of farm?” I asked.

Dr. Adegoke confirmed that he’d never visited a farm of any kind. He said that, until seven years ago, he had lived in a city of 21 million people in Nigeria. I’m guessing there aren’t many farms very close to a metropolis that large.


Dr. Adegoke brought a great sense of humor and a genuine interest in learning about dairy farming along with him, both of which are great qualities for someone learning how to milk a cow.

Since it was cold and snowing, we took Dr. Adegoke and Julia right to the barn to meet the cows and calves. I did tell them to come back this summer so we could show them the rest of the farm and the pastures.

Dr. Adegoke’s first comment when he saw the cows was, “They’re so big!”

Dairy cows are big – their average weight is 1,500 pounds – but most of them are also gentle. We picked Dove, an extra gentle cow, for Dr. Adegoke to milk. We showed him how to clean and disinfect her udder and attach the milking machine. He took to it like a pro!


I’m not sure that anyone who has milked a cow for the first time on our farm has ever been as exuberant as Dr. Adegoke was.

Once the milking machine was attached, we followed the milk from Dove’s udder into the milking machine, through the pipeline, and into the collection jar in the milkhouse. (From the collection jar, the milk is pumped into the bulk tank where it is cooled.)


When Dr. Adegoke saw the first milk flow into the collection jar, he exclaimed:

"I did this! This is my milk!"

His excitement was infectious. I think all of us dairy farmers should remember to be that excited about the work we do every day; remember how incredible it is that we have a part in providing pure, wholesome milk for people to enjoy.

As we talked, Dr. Adegoke explained why he wanted to visit a farm: “When I first started seeing dairy farmer patients at the clinic, I realized I didn’t have a clue what they were talking about. So I told Julia that I need to visit a farm.”

What an encouraging perspective!

Everyone can learn a lesson from Dr. Adegoke:


If we don’t understand what happens on farms,
we should go right to the source to learn more
 – visit a farm or ask a farmer.


There’s another reason why Dr. Adegoke’s interest in learning about dairy farms is important:

Julia explained that it’s easier for doctors to understand farm-related injuries if they’ve been to a farm to see the work environment.

Injuries do happen on dairy farms – both accident-type injuries, from contact with equipment and cattle, falls, etc.; and repetitive stress injuries from the physical labor.

After he completes his residency, Dr. Adegoke said he will likely be taking a job at a clinic in a small town in Wisconsin. I’m sure that understanding a dairy farmer’s way of life will be helpful there, too.


I hope you'll look past the bad flash and the snowflakes in this picture and see the big smiles. We all had a lot of fun showing Dr. Adegoke and Julia how to milk a cow and feed a calf.


Tuesday, February 16, 2016

The stories of our lives [Hoard's Dairyman Post]

This is my first post for the Hoard's Dairyman blog – HD Notebook.

As dairy farmers, we hear a lot about sharing our stories with consumers. Stories about why we farm and how we care for our cattle help us connect with consumers.

What we sometimes forget, though... [Read the rest of The stories of our lives here.]


I'm thrilled to say that this post is the first of many I'll be writing for the HD Notebook.

Thanks for reading!


Monday, February 15, 2016

Health Insurance, Part II [Dairy Star Column]

After my column about health insurance ran in the Nov. 28, 2015 issue of the Dairy Star, I received more emails, phone calls, text messages, and even a Facebook message in response to that column than any other column I’ve written in the past eight years.


health insurance file


So I decided to write a follow-up post and answer some of the questions raised by the readers who contacted me. Health Insurance, Part II is my latest column in the Dairy Star.


Saturday, February 13, 2016

Kick-Ass Cheesy Biscuits

Kick-Ass Cheesy Biscuits

A long time ago, Glen combined a handful of recipes to come up with his famous biscuits. He named them Kick-Ass Biscuits. It's abbreviated K-A Biscuits on the scrap of paper he scribbled the recipe on.

It's taken me six years to figure out how to make biscuits as good as Glen does. But I've finally done it. (A lot of it came down to the differences in how each of us measures flour.)

Then I did what I always end up doing to recipes: I tweaked it. I added cheese to Glen's biscuit recipe. Lots of cheese. The resulting Kick-Ass Cheesy Biscuits are so delicious. They really are worthy of their naughty name. They're also pretty darn easy to whip up when you're short on time. And nothing makes a meal seem special like warm, homemade biscuits.


Start by combining the flour, sugar, baking powder, and salt in a large bowl. The recipe below includes flour measurements in both cups and grams, because I've learned that everyone measures flour differently. I stir the flour up in the canister with a butter knife, scoop the flour, and level with the knife.

Then slice the butter into pieces and toss with the flour mixture. Cut the butter into the flour with a pastry blender until the butter is pea-sized.


Stir the cheese into the flour-butter mixture. You can shred your cheese yourself or use pre-shredded cheese. I use pre-shredded cheese because it saves time and means fewer dishes to wash.

Beat the egg lightly. (I use the same measuring cup for the flour, cheese, egg, and milk. Fewer dishes, again!) Dump the egg into the bowl, then pour in the milk. I stir the egg and milk together a little on the surface of the flour, then start mixing it all together.


The dough is half-mixed in the picture above. I forgot to take a picture when the dough was completely mixed. My little helpers took over mixing for awhile and I got distracted (imagine that!). The dough will be very stiff before all the flour is incorporated. I use a cutting motion at the end to mix in the last of the flour. You can use your hands to knead it in, too.

Turn the dough out onto a well-floured surface and shape it into a ball. Then, use your hands to gently press the dough out into a 1-inch oval. Add more flour to your surface and hands as needed.

Using a 3-inch biscuit cutter – or a drinking glass – cut biscuits from the dough. Place the biscuits on an ungreased baking sheet, spacing them about 1 inch apart. I can usually fit all 12 or 13 biscuits on a 12-inch by 15-inch baking sheet.


Slide the pan of biscuits into the oven for 12 to 14 minutes. I rotate the pan after 10 minutes to make sure the biscuits brown evenly. Take them out when the tops are golden brown.

lots of Kick-Ass Cheesy Biscuits


Kick-Ass Cheesy Biscuits

Prep Time: 10 minutes
Bake Time: 12 - 14 minutes
Makes: 12 - 13 3-inch biscuits

Ingredients

2½ cups all-purpose flour [350 grams]
¼ cup sugar
1 tablespoon baking powder
½ teaspoon salt
1 stick butter, cold [½ cup]
2 cups finely shredded colby-monterey jack cheese [200 grams | approx. 7 ounces]
1 large egg
1 cup whole milk

Directions

Place rack in center of oven and preheat oven to 425°F.

Combine flour, sugar, baking powder, and salt in large bowl.

Slice cold butter into 8 - 10 pieces, add butter pieces to flour mixture, and toss to combine.

Using a pastry blender, cut butter into flour mixture until pea-sized.

Add shredded cheese to flour-butter mixture and stir until cheese is coated with flour.

Beat egg lightly in measuring cup, then add to flour mixture. Pour milk into flour mixture as well. Stir with fork until wet and dry ingredients are fully combined, cutting through dough as needed or kneading with hands at end. Dough will be very stiff.

Turn dough out onto well-floured surface. Using well-floured hands, shape dough into ball and then gently press dough out into 1-inch thick oval.

Cut biscuits from dough using floured, 3-inch round biscuit cutter and place on ungreased baking sheet, at least 1 inch apart.

Gather scraps of dough together and shape into ball, press out, and cut biscuits. Repeat until all dough is used.

Bake biscuits until tops are golden brown, about 12 to 14 minutes.

Serve with butter and jam. (Yes, jam! Cheesy biscuits are delicious with jam!) Or eat them right off the pan. Or make them into bacon-egg-and-cheese biscuit sandwiches. Or... the possibilities are endless. We eat these with supper as often as we eat them with breakfast.

biscuits with butter and jam

P.S. There should really be a big glass of milk in this picture, too. You're going to want to wash these babies down with ice cold milk.