Wednesday, January 27, 2021

2020 Christmas Letter


Dear Family and Friends, 

In many ways, this year of so many cancellations has become a year of revival. This year we have sat down for more meals together as a family than I can count. I find myself bringing back recipes that I haven’t made in years.

Earlier this month, after reading our friend Suzanne’s words, encouraging everyone to continue sharing their Christmas greetings in spite of this year’s challenges, we decided to once again send a Christmas letter.

As part of our Christmas letter revival, after an eight-year hiatus, we each wrote down the good things that happened this past year. 


Here are some of the highlights:

• Finishing our new sauna (Glen and kids) 
• Playing in the snow (Daphne) 
• Dancing in Just For Kix shows and competitions (Monika and Daphne) 
• Swinging and tumbling in gymnastics (Daphne) 
• Winning the Regional 4-H Dairy Project Bowl competition (Dan and Monika) 
• Building countless blanket and cushion forts in the living room (Daphne) 
• Reading lots of books 
• Learning to ride bike and do tricks on her bike (Daphne) 
• Watching the Harry Potter movies on family movie nights 
• Hiking in Birch Lake State Forest (Sadie, Monika, and Daphne) 
• Searching for agates (everyone, led by Glen) 
• Playing with cousins and friends 
• Being Dad’s big helper – milking cows and riding in the skidloader (Daphne) 
• Spending weekends at the Cabin and Lake Lot 
• Playing softball in St. Rosa (Dan and Monika) 
• Riding the four-wheeler in the pasture (Dan) 
• Training for and finishing a triathlon – after a 16-year break (Sadie) 
• Writing letters to her pen-pal in Arizona (Monika) 
• Going back to school in person – hybrid for Dan, full-time for the girls 
• Trail riding – on a horse! – with my sister (Sadie) 
• Running cross country (Dan) 
• Regaining full use of my shoulder (Sadie) 
• Deer hunting (Glen and Dan) 
• Celebrating the miracle of life with countless new calves, kittens, and chicks 


Along with all of their activities, Dan, Monika, and Daphne continue to be all-around great kids, big helpers, and good students. Dan is in 8th grade at Melrose Area Middle School. Monika is in 6th grade and Daphne is in 2nd grade, both at St. Mary’s School of Melrose. 

Glen continues to keep our farm running. He can often be found researching dairy bulls, looking for the next group of sires that will give us beautiful cows with ultra-rich milk (i.e. lots of butterfat and milk protein).

I try to keep up with the kids, help with farm work, and support the Minnesota dairy community through my work on a number of boards and committees. I still write a monthly column for the Dairy Star and occasionally publish stories and recipes on my blog: www.dairygoodlife.com.

Although this year has been challenging at times, we strive to “see the flowers, not the weeds” and focus on the joys. We hope that you, too, are able to find the joys.

Wishing you all the merriest of Christmases and an abundance of goodness in the New Year!

Love,

Glen, Sadie, Dan, Monika, and Daphne

Sunday, March 15, 2020

Easy Pecan Pie Bars


These bars are so yummy they fall into the gone-in-one-day class.

I usually make these for Thanksgiving instead of traditional Pecan Pie. The ratio of shortbread crust to filling and pecans is irresistible.


Tomorrow is the first day of no school due to the coronavirus pandemic. This afternoon, Monika asked me to make these bars. I think she's craving a little comfort food. We probably all are.

Easy Pecan Pie Bars

Ingredients

For crust
½ cup butter [1 stick], softened*
1½ cups flour
½ cup sugar
¼ teaspoon salt

For filling
2 cups pecans, chopped

3 large eggs
1 cup sugar (white or brown)**
1 cup light corn syrup
1 teaspoon vanilla
½ teaspoon salt
¼ cup butter [½ stick], melted

Directions

Preheat oven to 375°F.

Coat a 9 x 13 baking sheet or glass pan with butter or cooking spray.

For crust: Beat butter with mixer. Add flour, sugar, and salt. Mix until crumbly. Press into pan. Bake crust for 7 minutes. Set aside.

For filling: Toast chopped pecans on baking sheet in oven for 8 minutes.

In small bowl, thoroughly whisk together eggs, sugar, syrup, vanilla, and salt. Whisk in melted butter. Stir in pecans with rubber spatula. Pour pecan mixture over pre-baked crust. Nudge pecans around as needed to ensure even spacing.

Bake for 18 to 20 minutes or until edges are firm and center of filling is set, but still jiggly.

Cool for at least one hour. Cut into small squares. Serve warm or at room temperature with whipped cream or vanilla ice cream.

Notes

*I only use Land O'Lakes Butter – because it's the best butter for baking and because we're farmer-members of the cooperative, which means the milk from our farm is used to make Land O'Lakes butter and cheese.

If you have a food processor, you can make this recipe with cold butter, as well. Add the flour, sugar, and salt to the bowl of your food processor, fitted with a chopping blade. Pulse briefly to blend. Cut butter into pieces. With food processor running, drop butter into flour mixture. Process on high until mixture looks like beach sand. Press into pan and bake as directed.

**White sugar gives these bars a mild, buttery flavor. Brown sugar gives these bars a more caramel-like taste. I always use Crystal Sugar Dark Brown Sugar.

Recipe adapted from Pecan Pie from The All New All Purpose Joy of Cooking.

Wednesday, March 4, 2020

The attack

Last July, I was mauled by a fresh cow while checking for newborn calves out in our pasture. I wrote this piece a couple days after the attack. I'm sharing it here now as part of my psychological recovery.

Strong bones and cell phones

Every so often – thankfully, not very often – something happens that makes you question your faith and give thanks, both at the same time.

One of those somethings happened to me last Friday.

I had just returned home from picking Dan up from summer camp in Palisade. I had shortened a visit with my sisters so that we could get home in time for chores. Glen’s back had seized up earlier in the week and he was moving pretty slow.

I said I would fetch the dry cows from pasture so that we could get a fresh heifer sorted out and into the barn.

I had a quick snack, changed into my barn shorts and a cut-off t-shirt, and headed out to the dry cow paddock.

As soon as I crested the first hill, I could see the dry cows grazing atop the second hill. I headed in their direction until I spotted a black cow lying alone by the second pond. “That would be Goldfish,” I thought to myself.

I changed direction to go see what Goldfish was doing.

As I approached, Goldfish stood up and – sure enough – there was a newborn calf lying in what had been her shadow.

I called Glen to tell him there was another new calf to pick up. There had already been one heifer calf right away that morning and a set of twin heifer calves born while I was gone picking Dan up. Four calves in one day might be a record for us; four heifer calves would certainly set a record.

I walked up to the calf and picked up its hind leg to see if it was a heifer calf or bull calf.

The next thing I remember is being on my back, underneath Goldfish, hearing her snorting and seeing her head and front hooves coming at me. I remember screaming at her to stop. I remember feeling pain and disbelief, as in “I can’t believe this is really happening.”

And then there was a pause in her attack – long enough for me to scramble to my feet and run.

I made it about 20 feet before the pain in my right leg wouldn’t let me go any farther. Thankfully, Goldfish stayed by her calf. As soon as I stopped, I could hear the engine of our 4-wheeler and knew Glen was on his way.

By the time Glen reached me, the pains in my right hip and right shin were leagues beyond anything I’ve experienced before. Glen noticed the instant bruises on my shoulder and collarbone and we decided I needed to go to the emergency room.

I knew I couldn’t get on the 4-wheeler, so Glen called our neighbors and asked them to come with their truck. Then he called his mom and asked her to meet us in the yard. While we waited, he took the stick we keep on the 4-wheeler and got my phone and sunglasses from where they fell next to Goldfish’s calf. He also checked the calf – it’s a heifer.

Glen, his mom, and our neighbors ended up making a stretcher out of a sheet of plywood and a bed sheet. They rolled me onto the plywood and slid the whole works into the back of his mom’s van.

A couple hours, a few scans, and a few x-rays later, I hobbled out of the emergency room with nothing more than a dozen nasty bruises and a few scrapes.

During those hours, I couldn’t stop the attack from replaying, over and over, in my head, but it helped fill in some of the gaps in my memory.

I know that Goldfish had been to my right when I walked up to the calf. Judging from the pain in my hip and the deep bruise there, I suspect she rammed me just as I bent over and first touched her calf, with her poll driving into my hip.

Based on the pattern of bruises I’m sporting, I believe I crashed onto my left shoulder and elbow. Goldfish then stepped on my lower legs as she continued forward, leaving hoof-shaped bruises on both calves. The only bruises I can’t figure out are the ones on my right collarbone, chin, and the back of my head. At some point while I was tumbling around, I must have caught a flying hoof or poll.

Those hours on the stretcher were also filled with lots of questions, anxiety, and lingering disbelief. Why this cow? Why now?

I have walked up to a cow and her newborn calf probably 1,000 times in 30 years of working with dairy cows. I know that it’s not unheard of for fresh cows to be protective, but I’ve never witnessed anything like this personally.

Furthermore, Goldfish had shown no signs of concern or aggression as I approached. Did she flip out because I was wearing a hot pink shirt? Do bovines respond to hot pink the same way they respond to red? Was she irritable because of the hot weather? Did she flip out because I was talking as I walked up?

But if I hadn’t been on the phone with Glen, nobody would have heard me scream…

Why in the pasture? Our pasture is my favorite place to be. Walking out to bring the cows in is my favorite job. I feel so much peace when I’m out there. To be attacked in my happy place is the ultimate addition of insult to injury.

Another recurrent thought I couldn’t stop was: “Maybe I shouldn’t be milking cows anymore. This is getting to be too dangerous.” Goldfish’s attack was my fourth cow-inflicted injury in two weeks. I didn’t exactly need something like this to make me question my dedication to dairy farming.

Then the “what if” questions started and those were the worst.

What if I hadn’t been able to scramble away?

What if I had stayed up north to visit longer and Glen had found the calf? He had been home alone.

What if it had been one of the kids who went out to bring the dry cows in? We send Dan and Monika to check dry cows and/or bring them in from pasture all the time.

These questions and thoughts – and the flashbacks – are proving hard to shake.

But, for now, I’m trying to focus on the words of one of the emergency room nurses: “You sure are lucky. Somebody up above must have been watching out for you.”

And I’m choosing to be thankful. For caring family and good neighbors. For skilled doctors and nurses. And for strong bones and cell phones.


Originally published in the Dairy Star.

Monday, November 18, 2019

All Things Tea

I started drinking tea when I was in college. Isn't that where all good habits start? *wink* My tea habit is now (gulp!) over twenty years old.

In the beginning, I sipped only herbal infusions, also known as tisanes or herbal teas. At some point, somebody recommended green tea for its health benefits, so I gave that a try and ended up adding it to my tea habit. A few years ago, I started expanding my tea palate to include black, oolong, and pu-erh teas.

As I explore new teas and learn more about the mental and physical health benefits of drinking tea, my love for tea continues to grow.

Below is a collection of my thoughts on all things tea and a guide for maximal tea enjoyment.

1. Steeping
2. Re-steeping
3. Upcycling Tea
4. Cold Steeping
5. Favorite Tea Brands
6. Favorite Tea Gear


1. Steeping

I love the ritual of making tea as much as I love the beverage itself. For many years, I boiled water for in a glass measuring cup in the microwave. A couple years ago, I switched to heating water in a small stainless steel kettle on the stove. Some claim the different heating methods produce different tasting teas, but, if there are any, they are minute.

  • Measure desired amount of water:
    • Tea bags – 8 ounces per bag
    • Tea sachets – 16 ounces per sachet
    • Loose leaf tea – 8 ounces for each teaspoon of tea leaves
* I heat ¾ of the water I need for the tea, then add cold water and/or ice after the tea is steeped to make the correct amount of tea. This way, my tea is ready to drink right away – without scalding my tongue.
  • Heat water to ideal temperature:
    • White tea – less than boiling (175°F)
    • Green tea – less than boiling (175°F)
    • Oolong tea – depends on the variety; some use less than boiling, some use boiling
    • Black tea, pu-erh tea, herbal infusions – boiling (212°F)
* This guide from The Spruce Eats gives a great (and more detailed) explanation of ideal water temperatures for tea.
  • Pour hot water over tea. (Don't add tea to hot water.)
  • Cover mug or teapot and steep:
    • White tea – 1 minute
    • Green tea – 3 minutes
    • Oolong tea – 3 to 5 minutes, depending on the variety
    • Black tea, pu-erh tea – 5 minutes
    • Herbal infusions – 5 to 7 minutes
  • Remove tea bag, sachet, or strainer from mug.
*Save your sachet or steeped tea leaves. See section below about re-steeping.
  • Add cold water and/or ice to cool tea to preferred drinking temperature. Enjoy!
  • Adjusting the flavor: If your tea tastes too bitter, try reducing the water temperature or steeping time. With loose leaf tea, you can try using fewer leaves. 
2. Re-steeping

I am 100% a child of the 'Reduce. Reuse. Recyle.' era. So I love that many teas can be steeped a second time for even more enjoyment. Some teas even taste more delightful on the second steep.
  • The best teas for re-steeping are loose leaf teas or those packaged in sachets. Tea in bags doesn't re-steep very well.
  • The number of times you can re-steep depends on the variety. In general, green, oolong, and black teas and herbal tisanes are good for two or three steeps; pu-erh tea can be steeped five times or more.
  • All varieties of tea can be re-steeped with boiling water. There's no need for cooler water for green or white teas.
  • Add 1 - 2 minutes to the original steep time, to extract more flavor from the tea.
*I steep all of my teas and herbal infusions, except pu-erhs, twice. Then I upcycle the twice-steeped tea (see the section below). Read more about re-steeping in this post from DiviniTea.


3. Upcycling Tea

My sister, Sara, gets credit for this idea. While visiting, she made a cup of tea for the drive home. After she left, I found the tea bag sitting in a cup full of water on the counter. I asked her about it and she said she always soaks her used tea bags. Now I do, too, but with a few tweaks to the method.

After I've steeped (and re-steeped) my tea, I put the tea bag, sachet, or loose leaves in a glass jar. I fill the jar with 16 ounces of cold water, cap it, and stick it in the fridge. A day or two or three later – whenever I get to it, really – the tea has transformed the water into a delicious, lightly flavored water.

I'm not sure if this beverage should be called upcycled tea or tea water – neither sounds very cool. Regardless of moniker, this flavored water is delightful. It's also a clear indicator of my frugality; every last drop of flavor (and beneficial phytonutrients) is squeezed out of the tea I purchase.


4. Cold Steeping Tea

Upcycling tea prompted me to try cold steeping tea. Mostly, this came about because hot tea isn't as enjoyable during the hot summer months as cold tea.

  • Combine cool water and tea in glass jar with lid.
    • 8 ounces water per tea bag
    • 16 ounces water per tea sachet
    • 8 ounces water for each teaspoon loose leaf tea
  • Place jar in refrigerator to steep.
    • Steep green, oolong, and black teas for 8 to 24 hours.
    • Steep herbal teas for 8 to 48 hours.
  • Strain tea or remove bag/sachet.
  • Cold steeped tea leaves/bags/sachets can be re-steeped several times.
*Read more about cold steeping tea in this article from Serious Eats.


5. Favorite Teas

I dedicated one of my newspaper columns to the topic of tea. While writing that column, I counted how many varieties of tea I actually had on hand. The number topped 40. Instead of listing my entire collection, here are some of my favorite tea brands:


Online (sold as loose leaf, in sachets, and in bags)
Grocery Store Brands (sold mostly in bags)
  • Tazo
  • Stash
  • Bigelow
  • Celestial Seasonings

6. Favorite Tea Gear

  • Tea Kettle

  • Tea Mug with Infuser

  • Tea Pot with Infuser

  • Tea Sachet Squeezer
Squeezing your tea sachet or tea bag is frowned upon by some, but I am a diehard squeezer. I love strong tea, enjoy bitter flavors (to a certain degree), and don't like dripping tea bags dribbling all over my counter.

Happy tea sipping!


I have no affiliation with the brands listed in this post, nor was I compensated for mentioning them.

Sunday, September 22, 2019

Apple Cinnamon Oatmeal Muffins

Lightly sweetened and made with 100% whole grain, these Apple Cinnamon Oatmeal Muffins are scrumptious.

Apple Cinnamon Oatmeal Muffins

Ingredients

¼ cup butter, melted [half a stick]*
½ cup packed brown sugar
1 egg
1 teaspoon vanilla
2¼ cups diced apples**
    OR 1 cup unsweetened applesauce
    OR 1¼ cups apples + ½ cup applesauce
½ cup whole milk

1 cup quick cook oatmeal
1½ cups white whole wheat flour
1 teaspoon ground cinnamon
2 teaspoons baking powder
½ teaspoon salt

Directions

Preheat oven to 400°F. Spray muffin tins*** with nonstick cooking spray or grease as desired.

In a large bowl, whisk together melted butter, brown sugar, egg, and vanilla. Stir in apples (and/or applesauce) and milk.

Mix together oatmeal, flour, cinnamon, baking powder, and salt.

Add dry ingredients to apple mixture. Fold together just until dry ingredients are mixed in. Don't over mix.

Spoon batter into prepared tins, filling tins ¾ full.

Bake for 14 to 16 minutes or until toothpick inserted in center of muffin comes out clean.****

Notes

*As always, I recommend Land O' Lakes butter. And not just because the milk from our farm goes to Land O'Lakes. Land O'Lakes truly makes the best-tasting butter, which makes baked goods taste better.

**I leave the peels on the apples when I dice them. Less work, plus more fiber.

***I use my Grandma Jeanie's vintage Comet muffin tins. I suspect these tins make smaller muffins than modern muffin tins. This recipe makes 18 vintage-size muffins.

****Muffins made with fresh, diced apples will bake faster than muffins made with applesauce.


When the bees out-pollinate themselves. And it rains all summer long. So you have more apples than you know what to do with. And the apples are as big as your hand. You pull out all the apple recipes you have. This apple muffin recipe has been a favorite for many years now.


If you like these muffins, you might also like these Apple Cinnamon Toaster Pancakes.

Enjoy, friends!

Monday, April 8, 2019

Dan's Chocolate Chip Cookies


Dan's Chocolate Chip Cookies

Makes approximately 48 cookies

Ingredients

1½ cups Land O Lakes® Butter [3 sticks]
1¼ white sugar
1¼ firmly packed brown sugar (I use dark brown sugar.)
2 large eggs
1 tablespoon vanilla extract
½ teaspoon lemon juice

4¼ cups all purpose flour [510 grams]
1 teaspoon baking powder
1 teaspoon baking soda
1 teaspoon salt
¼ teaspoon cinnamon

3 cups chocolate chips [18 ounces] (I use semi-sweet or milk chocolate or a combination.)

Directions

Preheat oven to 375°F.

Cream butter and sugars together. Add eggs, one at a time. Mix in vanilla and lemon juice.

Stir flour, baking powder, baking soda, salt, and cinnamon together. With mixer running, add flour mixture to butter mixture, about a half cup at a time. Mix just until flour is fully incorporated. Add chocolate chips and mix briefly.

Drop by heaping tablespoons (#40 scoop), 2 inches apart, onto ungreased cookie sheet. Bake 10-12 minutes or until cookies are puffed up and just starting to brown around the edges. They will flatten into chewy cookies as they cool.

Cool 2 minutes on cookie sheet. Remove to cooling rack to cool completely.

Serve with a big glass of milk.

Chocolate Chip Cookie Bars: Mix ingredients as if making cookies. Spray half sheet baking pan (11 x 16) with cooking spray. Press dough into prepared pan using butter wrapper. Bake at 375°F for 25 - 30 minutes or until golden brown. Cool and cut into bars. Serve with a big glass of milk.


The Story Behind the Recipe

One day, after I finished making a batch of my most-loved Whole Wheat Chocolate Chip Cookies, Dan asked me, “Can you make plain chocolate chip cookies? Like, with no nuts or anything like that?”

I didn’t have a tried-and-true recipe for plain chocolate chip cookies.

I thought for half a second about doing an internet search. But the idea of sifting through thousands of versions of chocolate chip cookies didn't appeal to me. (Out of curiosity, I just did a Google search for “chocolate chip cookies.” It yielded over 20 million results.)

But I know a baking guru who's far better than the internet. And she happens to be a dear friend.

I sent a quick message to Becky.


Until recently, Becky was the director of the Land O’Lakes Test Kitchen. I know the folks in the Test Kitchen test and tolerance test and test again each recipe before it becomes part of the Land O’Lakes recipe collection. I knew that if anyone could recommend the best "plain" chocolate chip cookie recipe, it was Becky.

Becky and I together in the Land O'Lakes Test Kitchen a couple years ago.

Becky recommended two recipes from the Land O'Lakes Test Kitchen: Chewy Jumbo Chocolate Chip Cookies and Five Star Chocolate Chip Cookies.

The recipes are essentially the same. The only difference is the size of the final cookie. I gave the recipe a try and baked the smaller-sized cookies. Dan – and the rest of my family – loved them instantly.


I agreed with my family. But I thought, "I can make these better."

Better. This a common theme for both my life and our farm.  Our farm motto is: "Better for our cows, better for our land, better for our family, and better for our community." I'm always asking, "How can I make this better?"

So I did. Borrowing the concept from my own favorite chocolate chip cookies, I added extra chocolate chips, a pinch of cinnamon, and a dash of lemon juice. You can’t taste the cinnamon and lemon, they just add dimension to the flavor profile – much the same way good tea and fine chocolate have nuances of flavor above and below the main flavor notes.

I shared the "better" cookies with my friend, Summer, and she said, “There's something special in these, isn’t there.”

"Yeah, there is," I grinned. "Butter!"

Then I let her in on my secret. There’s no point in keeping a good recipe a secret.

Here's the best part about these cookies, though. I've made this recipe with too much flour, too much sugar,  milk chocolate chips, semi-sweet chocolate chips, without the cinnamon and lemon juice, with dark brown sugar and light brown sugar... No matter the mistakes or variations, these cookies are delicious.

I was telling Becky one day about how forgiving this cookie recipe is. She said, "That's the sign of a good recipe. And that's why we do tolerance testing – to find the best recipes that turn out every time."

Dan's Chocolate Chip Cookies – as we now refer to them – really are some of the best cookies ever.


I am a Land O'Lakes Cooperative member-owner. I received compensation from Land O'Lakes for this post. All opinions are my own.

Monday, February 12, 2018

Easy Cheesy Valentines


Looking for an awesome alternative to candy for your kids' Valentine's Day exchange at school?

These Cheesy Valentines are perfect!

1. Start with your favorite snack cheese or string cheese.

Cheese makes a great Valentine's Day gift because it's so tasty! But, from a mom's perspective, cheese is great because its protein helps counter all of the sugar that comes with traditional Valentine's Day treats.


2. Add a cute label.

Standard mailing labels (Avery 5160 or 8160) fit perfectly on most snack-sized cheese.

The Avery Design & Print online label designer makes designing labels super easy.

Older kids can design their own labels. My littler kids sat with me and picked out the clip-art and fonts they wanted for their labels.


3. Pack the cheese snacks in an insulated lunch bag with a small ice pack so they stay cold until the exchange.

Happy Valentine's Day!


I am a Land O'Lakes Cooperative member-owner; I did not receive compensation from Land O'Lakes for this post. I have no affiliation with Avery Products Corporation, nor did I receive compensation for this post. All opinions are my own.


Tuesday, January 30, 2018

Fiesta Stoup

Veggies + Meat + Spices = Party in your mouth. But don't try eating it without cheese. Then it's not nearly as much fun.

Fiesta: party or celebration... derived from the Latin word for feast...

Stoup: thicker than soup... thinner than stew...

And that's exactly what this spicy, meat and veggie-rich soup/stew is: a party in your mouth.

But don't try eating it without cheese. Then it's not nearly as much fun.


This stoup comes together in minutes with three easy main ingredients: a bag of frozen sliced bell peppers and onions, a can of diced tomatoes, and shredded meat. I usually use leftover beef roast or pork roast. If I'm really craving this stoup, I'll bake a couple frozen chicken breasts and shred them.

I've been making this stoup for so long, I can't even remember how I first came up with the idea. But I do know what keeps me making it:

✔ Delicious!
✔ Quick and easy to make
✔ Minimal prep with recipe-ready ingredients
✔ Repurpose leftover roast beef, roast pork, or chicken
✔ Keeps and reheats really well! I make a double batch and eat it for lunch all week.
✔ Super nutritious: fiber (from veggies), protein (from meat and cheese), and phytonutrients (from veggies and spices)
✔ Very low carb
✔ Easily customizable: cut back on the chipotle and cayenne peppers for less heat; add a can of pinto beans (drained and rinsed); the variations are endless


Fiesta Stoup

Ingredients

1 cup chicken broth (or 1 cup water + bouillon/soup base)
14 oz bag frozen sliced bell peppers and onions (like Birds Eye® Pepper Stir-Fry)
14 oz can petite diced tomatoes (with juice)
2 cups cooked, shredded beef roast, pork roast, or chicken (approx. ½ pound)

2 teaspoons chili powder
2 teaspoons ground cumin
1 teaspoon garlic powder
½ teaspoon onion powder
½ teaspoon cocoa powder
¼ teaspoon ground oregano
¼ teaspoon smoked paprika
¼ teaspoon chipotle chile pepper
¼ teaspoon ground cayenne red pepper
¼ teaspoon ground black pepper
salt to taste

1 tablespoon lime juice

Co-jack cheese, sliced or shredded (I love the convenience of Land O'Lakes® Co-Jack Snack Cheese.)

Optional Accompaniments: sour cream, avocado, tortilla chips

Directions

Combine broth and frozen vegetables in medium pot. Cook over medium heat until vegetables are hot.

While vegetables are heating, combine spices in small bowl.

Add tomatoes, shredded meat, and spices to vegetables. Mix well to distribute spices. Reduce heat and simmer for 10 minutes to combine flavors.

Remove from heat and stir in lime juice.

Serve with cheese. I like to take a bite of Co-Jack Snack Cheese and follow it with a bite of Fiesta Stoup. It's just as good if you top the hot stoup with shredded cheese and let it melt.


I am a Land O'Lakes Cooperative member-owner; I did not receive compensation from Land O'Lakes for this post. I have no affiliation with Birds Eye or Pinnacle Foods Group LLC, nor did I receive compensation for this post. All opinions are my own.


Wednesday, January 17, 2018

Just Born – Favorite Newborn Photos and Stories of 2017

There's something abidingly special about newborn calves. Even after 30 years, every new calf still fills me with excitement, awe, and appreciation.
Darcie and Darla
Darcie and Darla

There's something abidingly special about newborn calves. I've been doing this for almost 30 years now. Checking for new calves, fetching new calves from pasture, assisting with the delivery of calves, etc. Every new calf still fills me with excitement, awe, and appreciation.

I could write a blog post about each calf and the story of her birth, the story of her family in our herd, what makes her special, and on and on. Perhaps this year I will. I didn't write much last year, but I'd still like to remember these newborns and their stories.

Plus, I find the challenge of taking newborn photos thrilling. There's nothing more rewarding than capturing a perfect moment in a picture. Cow and calf both looking, eyes open, ears up. Lots of times it all comes down to good timing and good luck, but I have developed a few tricks for getting the picture I want. The photo above of Darcie and her calf Darla from this summer is one of the best newborn photos I've ever taken. However, Glen thinks the photo, just below, of Agape and her calf, Ree, from 2014 is my best photo ever. Which one would you vote for?

Agape and Ree
Agape and Ree

Anyway, in addition to the photo of Darcie and Darla, here are the rest of my Favorite Newborn Photos and Stories of 2017.

Double delight

This story has multiple levels of incredible.

The story involves twin sisters Agape and Amore (pronounced Uh-gah-pay and Uh-more-ay; Greek and Italian words for love). Both Agape and Amore were due to have their calves a day apart: August 13 and 14. The odds of them both becoming pregnant at essentially the same time are incomprehensible. Especially considering that they're seven years old now and cows' fertility tends to decline as they age.

Their so-close due dates meant Apape and Amore got to spend their dry period together in the dry cow pasture. (We don't milk cows during the last two months of their gestations; this dry period, as we call it, allows them to rest before their next lactation and devote their energy to growing their unborn calf.)

Agape (right) and Amore

As their due dates approached, it started to look like Agape would calve early and Amore would calve late. With dairy cows, early calves tend to be girls and late calves tend to be boys. We kept our fingers crossed that both Agape and Amore would have heifer calves.

Agape did calve early, on August 9, with a heifer calf. This heifer calf is Agape's fifth heifer calf out of five pregnancies. It's rare for a cow to deliver 100% heifer calves. We named Agape's calf Agatha.

Agape and Agatha
Agape and Agatha

Four days later, and right on time, Amore had her calf. It's also uncommon for cows to calve exactly on their due dates. Joy of joys, the calf was a girl!

Unlike her twin sister, though, this was Amore's first heifer calf out of five pregnancies. The stars must have aligned just right for Agape and Amore to both deliver heifer calves at (almost) the same time.

Amore and Athena
Amore and Athena

No photos, please

Not every cow and calf pair agree with my ideas about newborn photos. Case in point: Georgia and her new heifer calf, Germany. It still turned out to be a pretty neat picture.
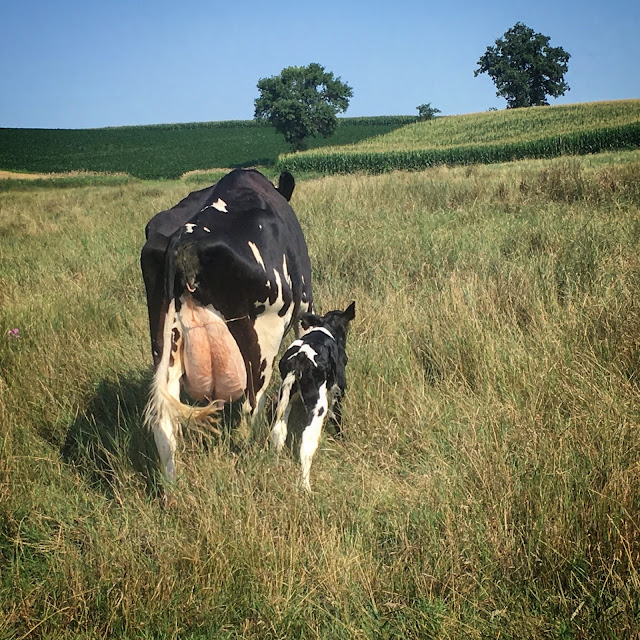
Georgia and Germany
Georgia and Germany

Three for you, three for me

Sisters Georgia (above) and Geisha (below) both gave birth to their third heifer calves this year. I didn't get a picture of Geisha with her calf, Glamour.

On our farm, cows achieve a special status when they have three daughters in the herd. Georgia and Geisha's mom, Gyspie, gave us five daughters in the 8½ years she was with us: Geisha, Georgia, Ghana, Gypsum, and Gambler. All of the cows in this family are redefining what it means to never age. Georgia is six years old now and starting to show her age a little, but Geisha, at 7½ years old, looks half her age.
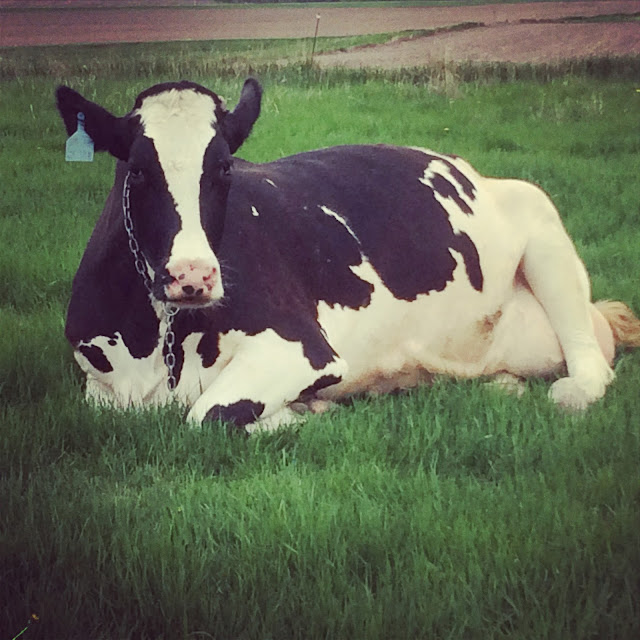
Geisha
Geisha

Like mother, like daughter

Sometimes calves come out looking just like their mothers. Sometimes they look like their fathers. And sometimes we just scratch our heads and wonder how exactly their chromosomes combined.

Glee came out almost a spitting image of her mother, Gloriana. Her arrival was met with many hoots, hollers, hips, and hoorays. Milking Shorthorn heifer calves are always exciting – especially roans.

Gloriana and Glee
Gloriana and Glee

Just, just born...

I don't often take pictures of seconds-old calves. Mostly, because during the summer our cows calve on pasture and we're rarely right there when they calve. And in the winter, we rush newborn calves to the incubator to warm them up, so there's no time to dally around snapping pictures. Plus, brand spankin' new calves are wet and slimy, which makes them considerably less photogenic than their dry, fluffy versions.

But, this year I got a couple photos of calves with their mothers immediately after their arrival.

Garnet's heifer calf, Glow, was much hoped for. Garnet is one of our Milking Shorthorns and the kids really wanted a spring Milking Shorthorn calf to show at the fair. Glow did end up going to the fair, with Monika at the halter, and did very well for a baby calf.

Garnet and Glow
Garnet and Glow

We said goodbye to Wink this fall. She will forever be one of Glen's favorite cows. This is the last picture I took of her. I'm glad it was a good one.
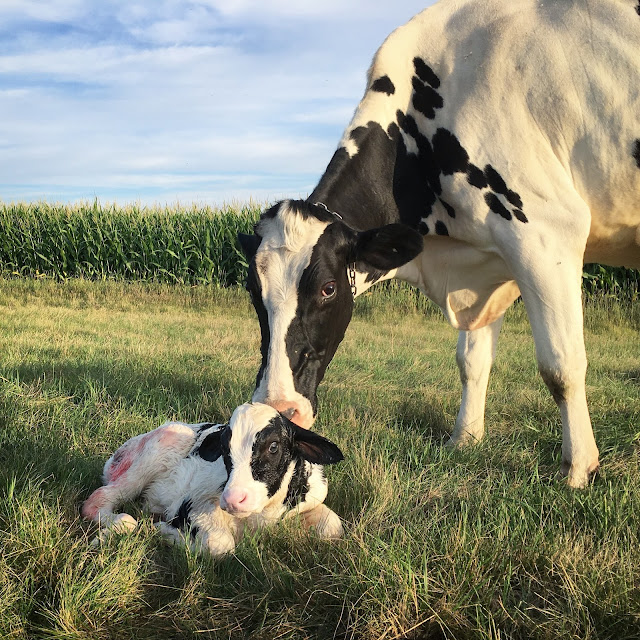
Wink and her bull calf

My niece actually took this picture of Stephanie and her calf, Sky, this spring; I was out of town with the kids when Stephanie calved and my niece knew that Monika would want to see a picture right away. (Stephanie is Monika's Jersey cow.)

One thing I love about this picture is that, if you look close, you can still see the soft white pads covering Sky's little hooves. These soft pads cover a calf's hooves in utero to make sure his/her sharp hooves don't puncture the placenta or the cow's uterus.
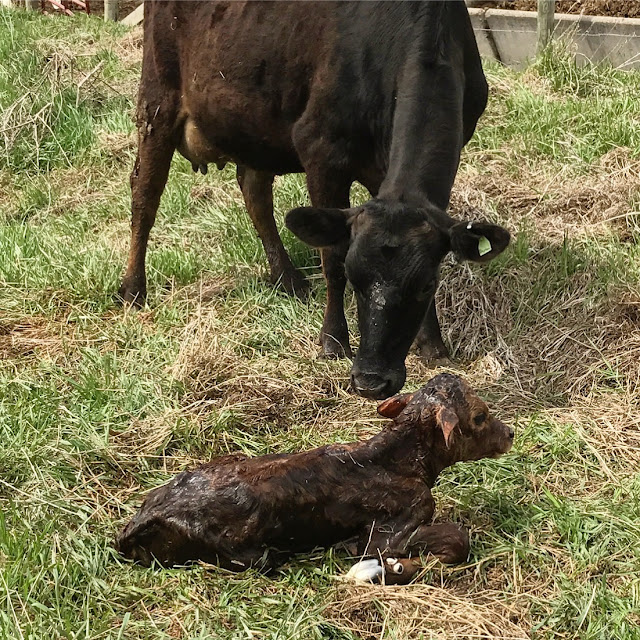
Stephanie and Sky
Stephanie and Sky

Last, but certainly not least...

One of the best newborn calf stories of the year is the story of Wonder and Whoops. The story is so good it has it's own separate post. (With even more photos of this adorable cutie!)

Whoops ended up going to the fair this summer, too, with Dan at the halter. She, too, did pretty darn well.

blue roan Holstein x Milking Shorthorn dairy calf
Whoops


Friday, December 29, 2017

Secret surgery

I've been struggling for the past week with whether to write about my recent surgery or continue to keep it hush-hush. I mostly kept the surgery a secret beforehand – telling only family and a few close friends.

But, I've decided that...

1. Writing is how I process the events of our lives.

2. I'm bored out of my freaking mind and writing gives me something to do.

3. If I try to explain everything here, fewer people will speculate about why I'm shuffling around with a belly pooch that looks suspiciously like I just had another baby.

4. If I continue to succumb to my fears of sharing, surgeries like mine will continue to be discussed only in hushed voices. [i.e. It seems perfectly normal and acceptable to talk about having heart surgery or an appendectomy; why does it seem awkward to discuss female-only surgeries?]

5. Perhaps my story will help another woman decide to seek solutions to her own health issues.


One week ago, I underwent a series of surgical procedures – the most familiar of which was a partial hysterectomy – to correct a series of anatomical problems.

To put it another way, my uterus and several other pelvic and digestive organs weren't where they were supposed to be and my team of surgeons put them back in their proper places – and in some cases, removed them.

If you're a dairy farmer reading this, you know that when organs don't stay where they're supposed to, cows have serious, life-threatening problems.

I wasn't having any serious, life-threatening problems.

However, at one point after diagnosis, while trying to help our kids understand what was wrong with me, I did compare my condition to a DA. (For you non-farmers, DA stands for displaced abomasum – a condition in which one of a cow's stomachs slips out of place. A DA requires emergency surgery for correction.) Our kids have seen our vets do surgery on cows in the past.

My situation included a half-dozen conditions that were painful at times, caused digestive problems, and interrupted my ability to do my farm work.

For several years, I dealt with the issues by trying to improve them myself: I tried a physical therapy program and special exercises; I changed the way I ate and exercised; I lost 40 pounds. All of those changes were supposed to help, but they didn't – my problems just kept getting worse.

Finally, this summer, I decided enough was enough and asked for a referral to see a specialist. The specialist said no amount of exercise or therapy was going to improve my conditions. He recommended surgery and sent me to see a second specialist for additional confirmation.

The second specialist agreed with the plan for surgical correction. He added extra surgical reinforcement to the plan since I have a physically-demanding job.

In the end, a half-dozen organs were involved in my conditions. The list of procedures included in the surgery is so long and hard to say (medically speaking) that we've just been referring to the surgery as a pelvic overhaul.

And just like there were multiple conditions, there were likely multiple causes: carrying and delivering three 9-pound babies; 20+ years of hard, physical labor, including a lot of heavy lifting and squatting down to milk cows; and my own genetics. The result was weakened ligaments and other supportive tissues that allowed organs to slip out of place, much the same way hernias happen.

Today, I can say that I think the worst is behind me.

The procedures went well. Part of the surgery was done laparoscopically with a robot and part of the surgery was done the old fashioned way – by hand. My surgeons were great and the nurses who took care of me during my hospital stay were exceptional.

My post-surgical pain has subsided considerably. So has the abdominal swelling. I'm not nearly as exhausted as I was the first couple days.

The timing wasn't the best – surgery right before Christmas was no fun. And we really didn't need another surgery in the family right after Daphne's appendectomy and abscess surgery. But we had met our health insurance deductible and I knew we couldn't afford not to have the surgery this year, so I pushed to get it scheduled.

The most challenging part now is the activity restrictions during recovery: bed rest for the first two weeks and then another four to six weeks of next to nothing with a 10-pound lifting restriction. Which means no farm work at all. Dan and Monika have been helping a lot outside in my absence – and in the house, too.

But I'm trying not to complain about the recovery process, because I chose this solution and can already tell that my previous symptoms are gone.

I'm looking forward to feeling a whole lot better in the new year.


Sunday, December 24, 2017

Dairy Christmas and Happy Moo Year!


Dear Friends,

Whether you're near or far...

Whether you're a new friend or an old friend...

Whether we've shared a laugh together recently or not...

Know that we're thinking of you this holiday season.


Dan is 11 years old now and in 5th grade.


Monika is 8 years and in 3rd grade.


Daphne is 5 years and in pre-school. She will start Kindergarten in the fall.


Glen and I celebrated 15 years of marriage in September and can't believe how fast these years have gone by.

We will remember 2017 for several reasons – both rewarding and challenging. But through it all, we are incredibly thankful for the gifts of family, love, and health.

From our family to yours, we wish you a joyous Christmas and all the best in the new year.

Love,

The Frerickses


Monday, December 18, 2017

Auntie Konnie's Peanut Butter Krispy Bars


Running short on time this holiday season? Need a quick, festive treat for your Christmas gathering? My Auntie Konnie's Peanut Butter Krispy Bars – drizzled with chocolate and dressed up with sprinkles – are perfect. These rich, chewy bars are not your average krispy bars. Made with a full stick of Land O Lakes® Butter and lots of peanut butter, they're more fudge than they are cereal.

There are few holiday traditions I love more than creating and decorating Christmas cookies and candies. Each year I develop a list of treats I plan to make. Most often, that list includes more than a dozen different treats – many of them recipes I've created myself, others heirloom recipes that have been passed down from beloved family members and friends, and usually a new recipe or two that I've stumbled upon.

This year, though, life had other plans for me. With Daphne's recent surgeries and hospitalizations, the only things I've been measuring are medications. I've accepted that my long list of Christmas cookies will wait until next year.


But I still wanted to bring something sweet along to Glen's family's Christmas gathering this past weekend. During chores one morning last week, I pondered what I could whip up quickly. Usually, when I need a hurry-up pan of something sweet, I make my Cocoa Crispy Bars, but, tasty as they are, I decided they weren't festive enough.

Then I thought of my Auntie Konnie's Peanut Butter Krispy Bars.

One day this fall, when I was still daydreaming about Christmas cookies and candies, I took inventory of my baking cupboard. I was shocked to find six bags of marshmallows. Who needs six bags of marshmallows? Who bought them all?

(We won't talk about how many pounds of butter we have in inventory. That's never an issue. *wink* )

Determined to reduce our inventory, I decided to make marshmallow krispy bars. The only problem was that marshmallow krispy bars were my culinary nemesis for a long time. I almost always make krispy bars with corn syrup and sugar. Whenever I tried to make krispy bars with marshmallows, they turned out un-chewable.

My Auntie Konnie always made the best peanut butter krispy bars. She died this fall and I will forever regret not asking her for her recipe – although I suspected she never followed one.

I asked my sisters if they had her recipe. They confirmed my suspicion. Auntie Konnie didn't follow a recipe. Just use lots of butter and peanut butter, they said.

Well, I had six bags of marshmallows to experiment with, so I gave it my best shot.


Three bags of marshmallows later, I had both the ingredients and technique perfected. My peanut butter krispy bars now taste just as good as Auntie Konnie's. The secret really is lots of butter and peanut butter. Isn't everything better with lots of butter?

Anyway, back to my need for a quick Christmas treat...

It seemed fitting to remember Konnie by turning her signature dessert into festive, Christmas bars.

I whipped up pan of peanut butter krispy bars and decorated them with white and dark chocolate drizzles and lots of Christmas sprinkles.

Dan, Monika, and Daphne were super impressed. And, I have to say, they disappeared pretty quickly from the dessert table at Christmas.

I'm thinking Auntie Konnie's Peanut Butter Krispy Bars will have a regular spot on my list of Christmas treats.


And just in case you’re still wondering about whether to put them on your list, here are all the reasons Auntie Konnie’s Peanut Butter Krispy Bars are perfect Christmas treats:

✔ Delicious!
✔ Quick and easy to make
✔ Ingredients you probably have on hand
✔ Kid-friendly – to make and to eat
✔ No advance prep or chilling required
✔ No baking
✔ No refrigeration required (save space in the fridge!)
✔ Infinitely customizable – sprinkle with crushed candy, toffee bits, or whatever your heart desires!


Auntie Konnie’s Peanut Butter Krispy Bars

Make time: 30 minutes
Yield: 24 bars

Ingredients

½ cup (1 stick) Land O Lakes® Butter
16-ounce bag of marshmallows
1½ cups peanut butter (chunky or creamy)
6 cups crisp rice cereal

2 ounces chocolate chips (⅓ cup)
½ teaspoon solid coconut oil or shortening
2 ounces white almond bark or white chocolate chips (1 cube or ⅓ cup)
Green and red nonpareil sprinkles

Directions

Spray a 9 x 13 pan with nonstick cooking spray and wipe out excess.

Melt butter in a large pot or dutch oven over low heat. (Save the butter wrapper – you’ll use it later!)

Once butter is melted, add marshmallows to pot. Keep heat low and stir frequently until marshmallows are completely melted. (If the heat is too high, the finished krispie bars will be too hard.)

Remove butter-marshmallow mixture from heat and stir in peanut butter, then cereal.

Spoon cereal mixture into prepared pan. Use butter wrapper to press down evenly.

To decorate:

Melt chocolate chips and coconut oil (or shortening) together, then drizzle over bars. (I melt the chocolate chips and shortening in the microwave, transfer the melted chocolate to a plastic sandwich bag, snip off a corner of the bag, and drizzle.)

Repeat with white almond bark or white chocolate.

Top with sprinkles.

Let bars cool before cutting into 24 squares.

Store in airtight container.


I am a Land O'Lakes Cooperative member-owner. I received compensation from Land O'Lakes for this post. All opinions are my own.